Changelog
New features, improvements and fixes across the Monta platform. The roadmap shows what is coming; the changelog shows what is already live.
159 updates
October 2026
16 updatesVote on feature requests in Monta Hub
See what other operators have asked Monta for, and vote for the features that matter to you. A new Feature requests board sits next to the Roadmap under What's New in Monta Hub. Send a request from the Helpdesk: tell Monta why you need it, what you need and by when. Monta reviews every request: it's added to an existing request or becomes a new one, rewritten so it reads clearly for every customer. Vote on the board: requests that apply to many customers are published on the board, ranked by how many people back them. Vote for the ones you need. Follow and get updates: each request has its own page with the full description, updates from Monta and how many operators back it. Followers hear when Monta posts an update and when a request ships. Until now, a feature request was a ticket only you could see, and there was no way to tell whether others needed the same thing. The board turns one-off asks into shared requests: you can add your voice to what's already there, and Monta sees how many customers need each one when planning the roadmap. Browse and vote: in Monta Hub, go to What's New → Feature requests and select the vote button on a request. Send a new request: select Helpdesk → New → Feature request, and fill in Summary, Why, What and When. Follow a request: open it and select Follow. Voting follows it automatically. Only requests written by Monta appear on the board. Your own ticket text is never shown to other operators, and other operators' names are never shown. Voting tells Monta how many customers need a feature. It doesn't guarantee when or whether it ships. How do feature requests and voting work in Monta Hub? How do I report a bug or request a feature in Monta Hub?
Read more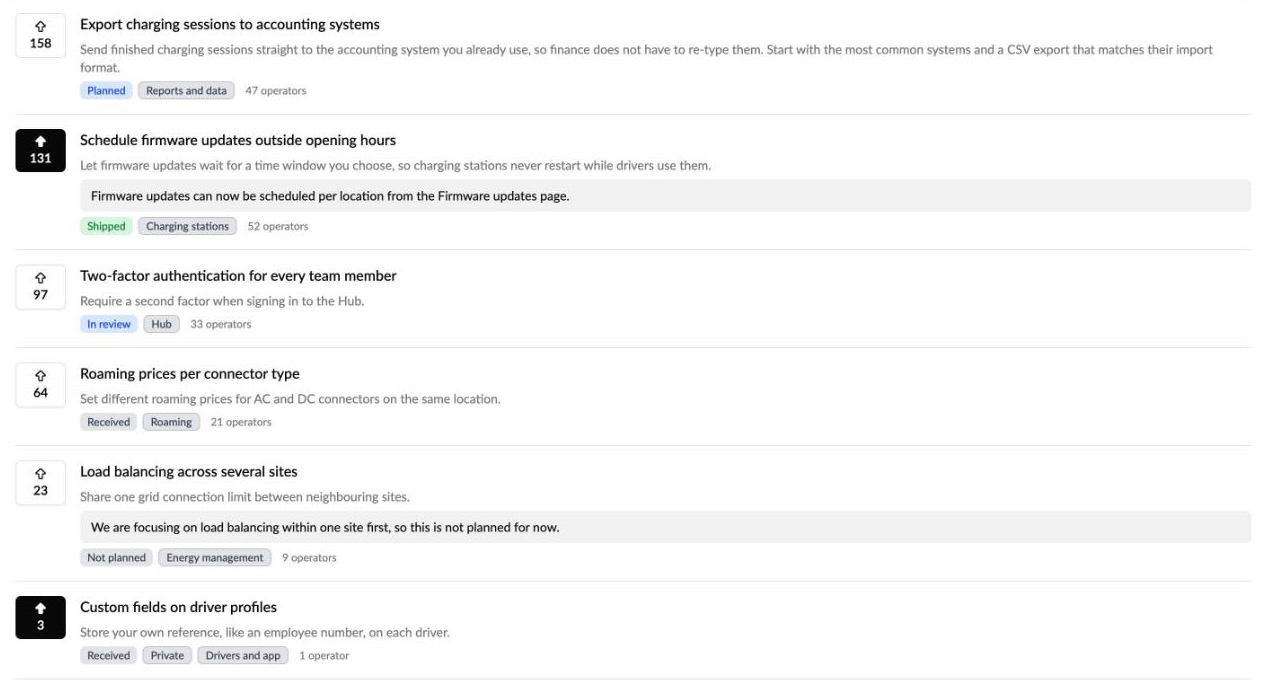
Dynamic tariffs is now Energy tariffs
Dynamic tariffs is now called Energy tariffs, and it opens on your own tariffs. Energy tariffs: the page, the sidebar, the price group's tariff toggle, the public price preview and Monta AI all use the new name. Energy tariffs covers every tariff you can put on a price group: time-of-use schedules and market-priced (dynamic) tariffs. Opens on My tariffs: the page now starts on the tariffs you and your accounts built, instead of Monta's public catalog. Public library: Monta's curated public tariffs are now called Public library, both on the Energy tariffs page and in the price group's Add tariff picker, so the two places name the split the same way. Operators opening the page landed on "Public", often found it empty, and read it as "tariffs I offer to the public". Starting on your own tariffs and naming the catalog a library makes it clear what's yours and what Monta provides. "Energy tariffs" also describes what they are better than "dynamic", which is only one of the two tariff types. In Monta Hub, open Energy tariffs in the sidebar. Your tariffs are under My tariffs; browse and copy Monta's under Public library; live market prices are under Spot market. To use a tariff, open a price group → Edit → turn on Energy tariff → Add tariff. Old links to Dynamic tariffs keep working and open Energy tariffs with the same tab and filters. Nothing changes in how tariffs are priced or billed.
Read moreChoose who a plan is for and which EVSEs a subscription bills
You now decide who each subscription plan is for and exactly which EVSEs a subscription bills, by account type and by AC/DC. Available for on plans: limit an account or sub-account plan to All accounts, Professional accounts, or Private & personal accounts. Only matching accounts see and can get the plan, in Hub, in the Monta app and through the Partner API. Pick AC, DC or both when applying: when you apply a plan to an account or sub-account, choose which current type it bills. AC and DC is the default. Billed EVSEs on every subscription: see which account types and current types a subscription bills, and how many of the customer's active EVSEs that is today ("Billed now: 10 of 12"). Edit with live counts: change the billed account types and AC/DC from Edit subscription. Each box shows how many EVSEs it covers, so you see the effect before you save. Current type column: an account's Subscriptions tab shows each subscription's AC/DC badges. Until now, a plan could be applied to any account, and a subscription billed all of a customer's EVSEs. Operators who price AC and DC differently, or who serve businesses and households with different offers, had to work around it. Now one customer can have an AC plan and a DC plan side by side, professional-only plans can't end up on private accounts, and you can always see what a subscription will bill. Set who a plan is for: in Monta Hub, create or edit a plan and pick Available for at the end of the Subscription settings step. Apply with AC/DC: open the account → Settings → Subscriptions → Apply subscription, pick the plan and the Current type. Change what's billed: open the subscription → Quick actions → Edit subscription → Billed EVSEs. Changes to Billed EVSEs take effect from the next billing period. The same EVSE is never billed twice: you can't add an AC/DC or account type that another subscription of the same customer on the same plan already bills. Charge point (EVSE) plans bill one EVSE, so they don't have these settings. Who a plan is available for Choose AC, DC or both Billed EVSEs
Read moreClaw back reimbursements already paid to an employee's wallet
Account admins can reverse a reimbursement paid out after a charging session when it turns out to be ineligible, with the reason on record.
What's new Available now in early access: account owners and admins can claw back reimbursements that were already paid out after a charging session. They select the charging sessions, pick a reason, and the full reimbursement moves from the employee's wallet back to the account's wallet. A new Clawbacks tab shows every clawback and where it stands. Why it matters Reimbursements paid out after each charging session reach the employee's wallet as soon as the session ends, so a session that later turned out to be personal use, a duplicate or otherwise ineligible stayed paid. Your customers can now correct it in the Hub, with the reason recorded and the employee notified, instead of settling it outside Monta. Who it's relevant for Operators whose customers pay out home-charging reimbursements after each charging session. End-of-month reimbursements aren't paid until the payout, so they can't be clawed back. How to use it Open the account in Hub and go to Reimbursements → Charge sessions. Select the charging sessions to reverse and click Claw back. Pick a reason (suspected personal use, duplicate, not eligible, employee offboarded or other) and add a note if needed. "Other" needs a note. Follow each clawback under Reimbursements → Clawbacks. The relevant transactions can be viewed in Payment -> Transactions A clawback can't be undone, and it never takes the employee's wallet below zero. If the balance is too low, Monta tries up to three times, about three days apart, then marks the clawback failed and tells the account owner to settle it with the employee directly. Employees see a notice in the app that their employer can reverse a paid reimbursement, and they get a push notification and an email when a clawback completes or is delayed. When account admins set up reimbursement, they confirm that their agreement with employees covers this. Availability In early access: operators on the Early access track have it already, and any operator can turn it on under Admin → Release channel.
Read moreTrack every bug report and feature request to Monta in the Helpdesk
You can now report bugs and request features to Monta from Monta Hub, and keep track of every one of them in one place. The Helpdesk shows all your tickets to Monta with a live status, so you always know what's been received, what's confirmed, what's planned and what has shipped. And our promise: every ticket gets a reply from Monta within 5 business days. A reply within 5 business days: Monta replies to every bug report and feature request within 5 business days, so no ticket is left waiting without an answer. All your tickets in one overview: Helpdesk in the sidebar lists every bug report and feature request your organisation has sent to Monta, with its status, type and last activity. Search, filter by status and export the list. Follow every status: each ticket moves through clear statuses: Received, In review, Needs your input, Confirmed (we agree it's a bug), Planned, In progress and Shipped, or Answered and Not planned with the reason in the ticket. Get notified: you follow the tickets you raise automatically and get an email and a Hub message when Monta replies or changes the status. Follow a colleague's shared ticket to get the same updates. Unread news is marked in the list and counted in the sidebar. The full story on every ticket: a timeline shows every status change, and the conversation with Monta stays on the ticket, so anyone on your team can catch up. Bug reports and feature requests: attach screenshots and screen recordings to bug reports. Feature requests ask for the product area, the impact on you and your current workaround, and go straight to Monta's product team. Share feedback opens a ticket: the Share feedback button now starts a bug report or feature request to Monta, so your feedback gets a reply. Until now, bugs and ideas reached Monta by email, calls and survey forms, and it was hard to know what happened next. Now your teams can see every open bug and request at a glance, know when Monta needs their input, and see when a fix or feature has shipped, without chasing anyone. In Monta Hub, select Helpdesk in the sidebar to see all your tickets. Select New, or Share feedback on any page, and pick Bug report or Feature request. Open a ticket to see its timeline, reply to Monta, or Follow it for updates. A good bug report says what you did, what you expected and what happened instead. A screenshot or short recording helps us fix it faster. Monta's product team reads every feature request, but can't promise when or whether it ships. How do I report a bug or request a feature in Monta Hub?
Read more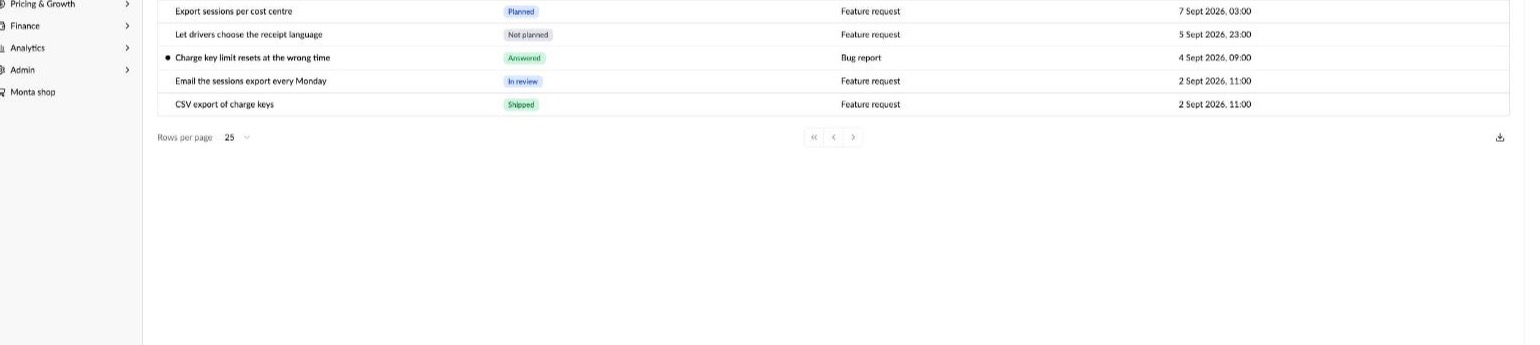
A new look for the Monta map, in light and dark
The Monta web map has a new design, with light and dark themes. It now reads at a glance: what's free, how fast, how much and how far. This applies to maps.monta.app and to the map you embed on your own website. https://maps.monta.app Light and dark themes: the map follows the driver's device setting, and drivers can switch with the sun and moon button. Embedded maps without controls stay light. Pins that tell you more: every pin shows the charging speed and, for sites, how many chargers are free, for example "22 kW 9 free". Overlapping sites stack instead of turning into numbered circles. Nearby list: on desktop, the sidebar lists the chargers in view, nearest first, with availability, speed, connector, distance and price. Quick filters: Only available, Fast 23+ kW, Ultra fast 100+ kW and Find Best Price are one tap away. The full filter panel opens from Filters. Clearer details: a site leads with "9 of 12 free right now", key facts show as pills, and Start charging stays at the bottom of the panel. Built for phones: drivers swipe through cards for the nearest chargers, tap a card for the full details and get directions from every card. Fixes: shared charger links now open on a first visit, addresses no longer show "null", and long charger names no longer push the price off the card. Drivers decide where to charge in seconds. Showing free chargers, speed and price on the map itself, instead of numbered circles, gets them to an available charger faster. For you, that means fewer drivers arriving at a busy site and a map on your website that looks current. If you embed the map: the filter panel is now closed by default, with quick filters above the list. Links with filter_ui=1 still open it. Embeds without a map_style now use the colourful light map. Add map_style=silver to keep the previous look. Your marker colours and marker style settings still apply, on the new pins. maps.monta.app How do I build an embeddable charge point map for my website?
Read more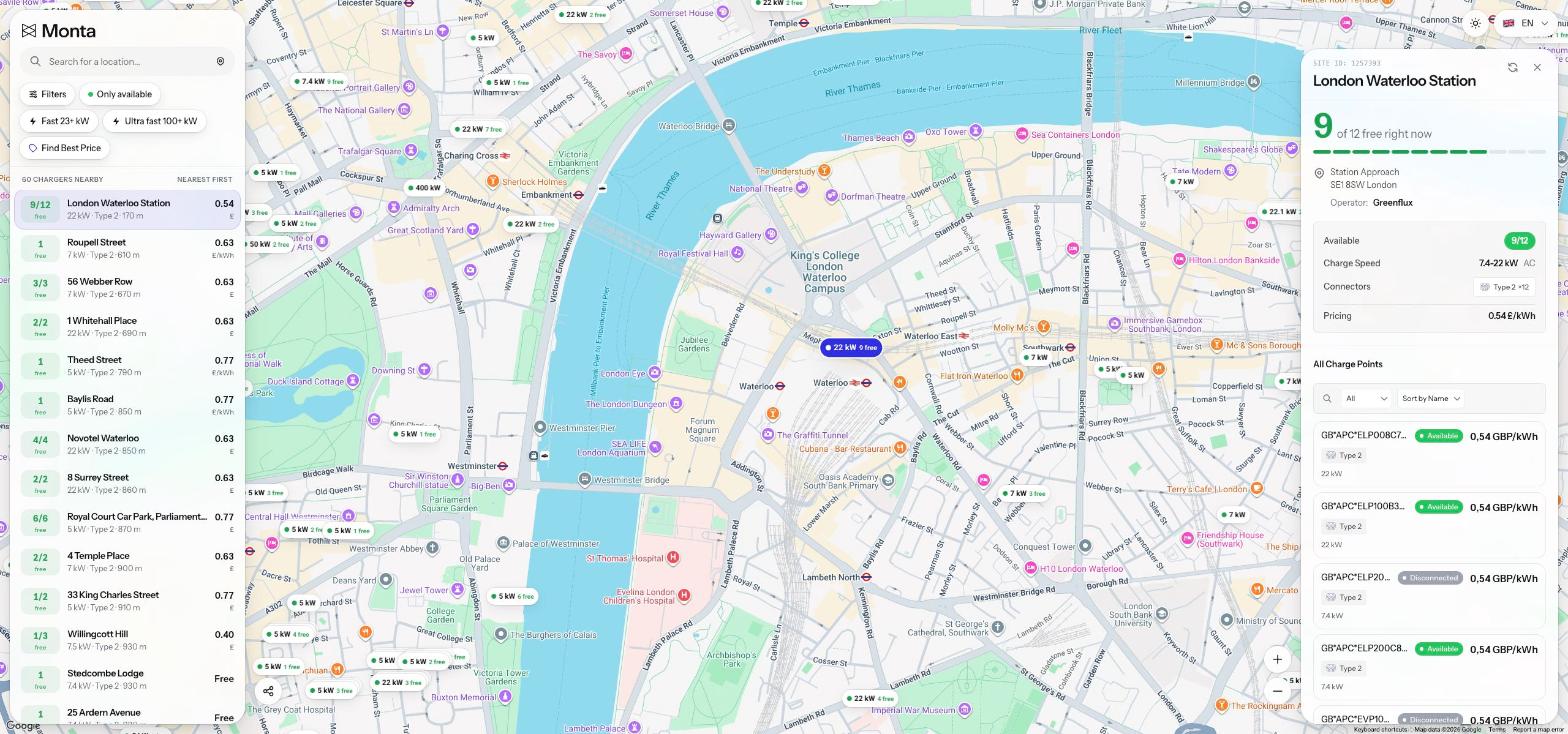
See which charge keys roaming partners refuse, and why
A Roaming conflicts tab on Charge keys and a Roaming partners tab on each key show when an RFID UID clash stops a key working on partner networks.
What's new Available now in early access: Hub shows when a charge key's RFID UID is in conflict on roaming networks, and what that means for the key. A new Roaming conflicts tab on Charge keys lists every open conflict across the keys in your selected accounts. A new Roaming partners tab on each key shows whether every roaming partner accepted it, with the partner's last error. Charge keys → Roaming conflicts lists every open conflict across your keys. Why it matters A charging station only reads a card's RFID UID, so each network can link a UID to just one eMSP. When another eMSP holds the same UID, your key is refused on partner networks, and until now nothing in Hub told you why. Your support team can now answer "my card works at home but not on partner X" in Hub, and see which keys aren't reaching partners at all. Who it's relevant for Operators who issue charge keys that drivers use on roaming partner networks. How to use it Open Charge keys (EMP / Fleet) and select the Roaming conflicts tab. Filter by status, conflict type, partner or account. For example, pick a partner to see every key it refused. Select a row to open the key's Roaming partners tab. It shows each partner's status (Accepted, Retrying, Rejected, UID conflict or No data), when the key was first and last accepted, and what the partner sent back. After you change a key, use Push to partners to send it to every partner again. A key's Roaming partners tab explains each conflict and shows every partner's answer. Each conflict is labelled by who holds the RFID UID. Held by other eMSP means another eMSP holds it, so the key isn't sent to any partner. Refused by partner means one partner won't accept the key. Claimed by other eMSP and Between other eMSPs don't stop Monta sending your key to partners, but because another eMSP also uses the RFID UID, the key may not work on every part of a partner's network. While another eMSP holds the RFID UID, the key isn't sent to partners and Push to partners is unavailable. To work through conflicts offline, export the Charge Key Roaming Conflicts dataset from Analytics → Data exports. Availability Accounts on the Early access release track have it already. On any other track, an operator admin can turn on Charge key roaming conflicts in Release channel, or try it on one login first with Try myself. Learn more How do I find charge keys with roaming conflicts in Monta Hub?
Read more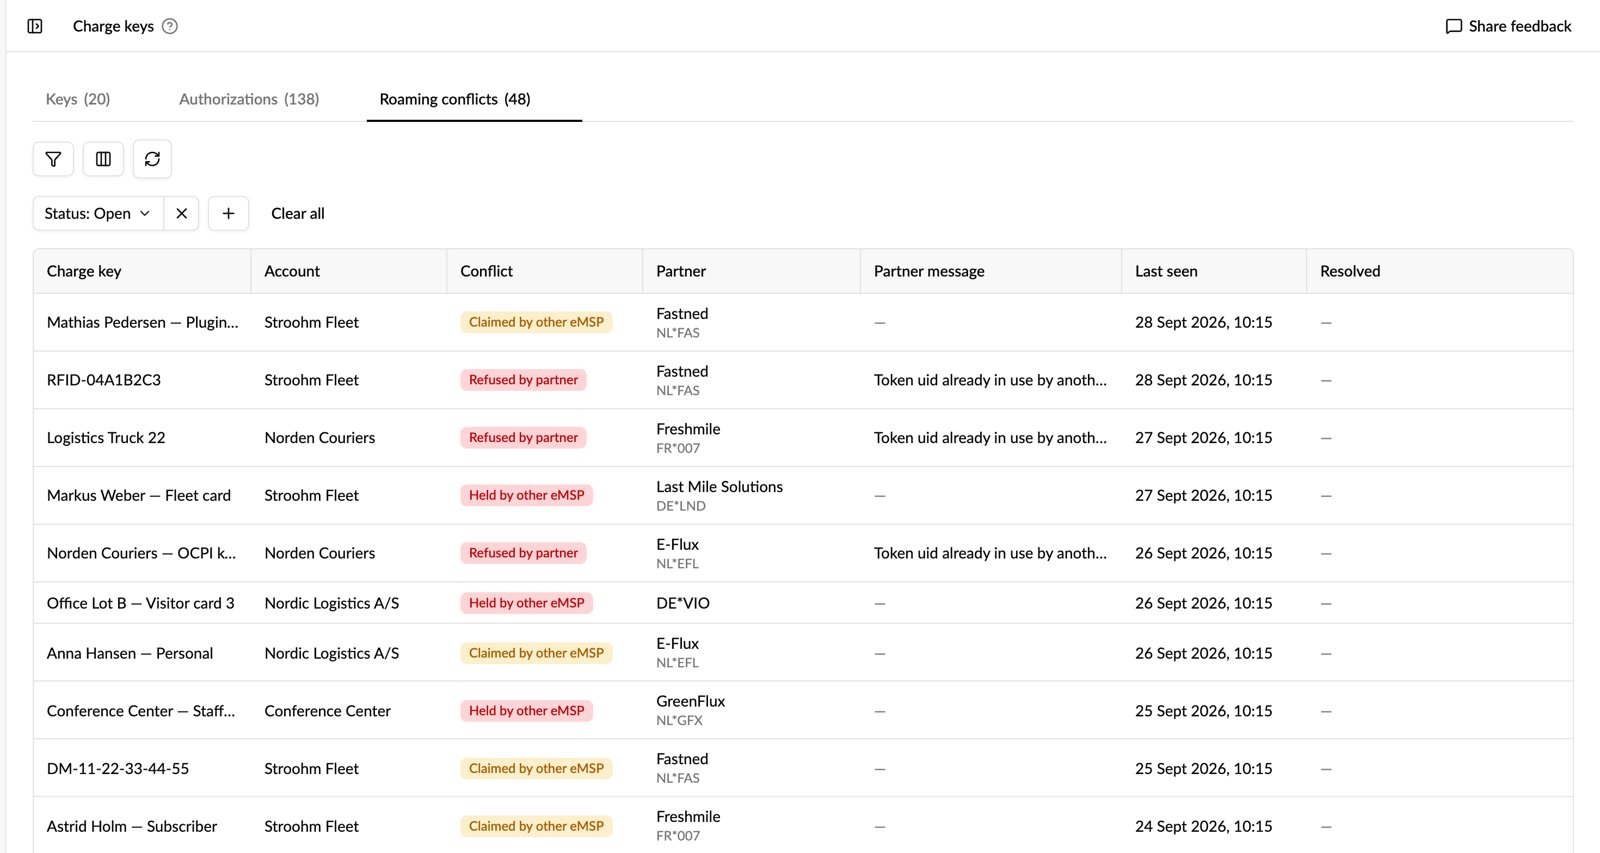
Idle fee grace periods by weekday and on public holidays
Grace periods now follow your week. Choose the days each idle fee grace period applies on, waive the fee all day, and include public holidays, so you can say "no idle fee overnight on weeknights, and none at all on weekends and public holidays" in one price group. Days per grace period: pick Mon–Sun for each grace period, or use a preset: Every day, Weekdays, Weekends, or Weekends and public holidays. All day: waive the idle fee for the whole day with one toggle. Public holidays: turn on Public holidays to waive the fee on holidays too. Each charge point uses the public holidays of the country it's in, so one price group works across countries. Your own holiday calendar: national public holidays are kept up to date automatically. Add your own days, like a local festival or a company closing day, or remove a holiday you stay open on, under Public holidays in your operator settings. Week at a glance: see exactly when the fee is waived on each weekday and on public holidays, including overnight periods that run into the next morning. Clashing periods are flagged before you save. Clear prices for drivers: the public price shows the days next to each grace period, for example "22:00 → 06:00 Mon–Thu". Idle fees keep chargers free when people are waiting, but nobody is waiting at an office car park on a Sunday or at a residential site on Christmas Day. Until now a grace period applied every day, so your teams had to choose between charging drivers when it made no sense or giving up the fee altogether. Now the fee works only when it should. Open a price group, go to the Idle fee and open Grace periods. Add a grace period, set the times or turn on All day, then pick the days and, if you want, Public holidays. Select Public holidays to see the holiday dates for any country, and Change holidays in operator settings to adjust them. An overnight grace period belongs to the day it starts on: a Friday 22:00–07:00 period also covers early Saturday morning. A public holiday also gets the grace periods of the weekday it falls on. How do I create additional charging fees?
Read more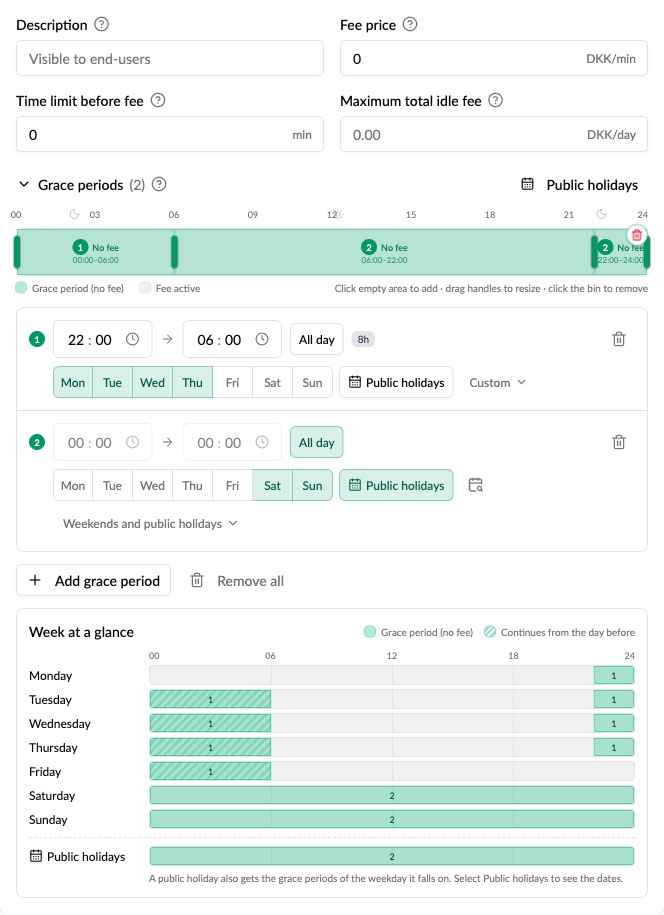
Apply a global price group as the default for many accounts at once
You can now apply one of your global (operator) price groups as the default price group for many accounts at once. Everyone who joins those accounts later, with the join code, an invitation or an import, gets it automatically, so new members never land on the wrong price or charge for free. Set default price group, in bulk: select accounts on the Accounts list, pick one of your member price groups and set it as the default for all of them in one step. Accounts in a different currency are skipped and counted, so nothing is set by mistake. Apply to → New members (account default): open a global member price group, select Apply to and choose New members to make it the default for the accounts you pick. Existing members still moves the people who are already members. Set as default on a single account: on an account's Price groups tab, global price groups can now be set as the account's default too, with a confirmation that names the price group you're replacing. See what new members get: under the join code on the account's Settings tab, Hub shows which price group new members get, or warns you when no default is set. You can't always control who joins an account or when. Until now, a global price group couldn't be an account's default, so your teams had to copy the same price group onto every account, or use an account setting as a workaround. Now one global price group can be the joining price for every account that needs it, set in a single step. Go to Accounts, select the accounts, then select Set default price group. Or open a global member price group under Pricing & Growth → Price groups, select Apply to, then New members (account default). For a single account, open its Price groups tab and select Set as default on the price group. Existing members keep their current price group. If an account uses an account setting that names a default member price group, that one still decides what new members get. You can set the default on up to 500 accounts at a time. How do I apply a price group as the default for new account members?
Read more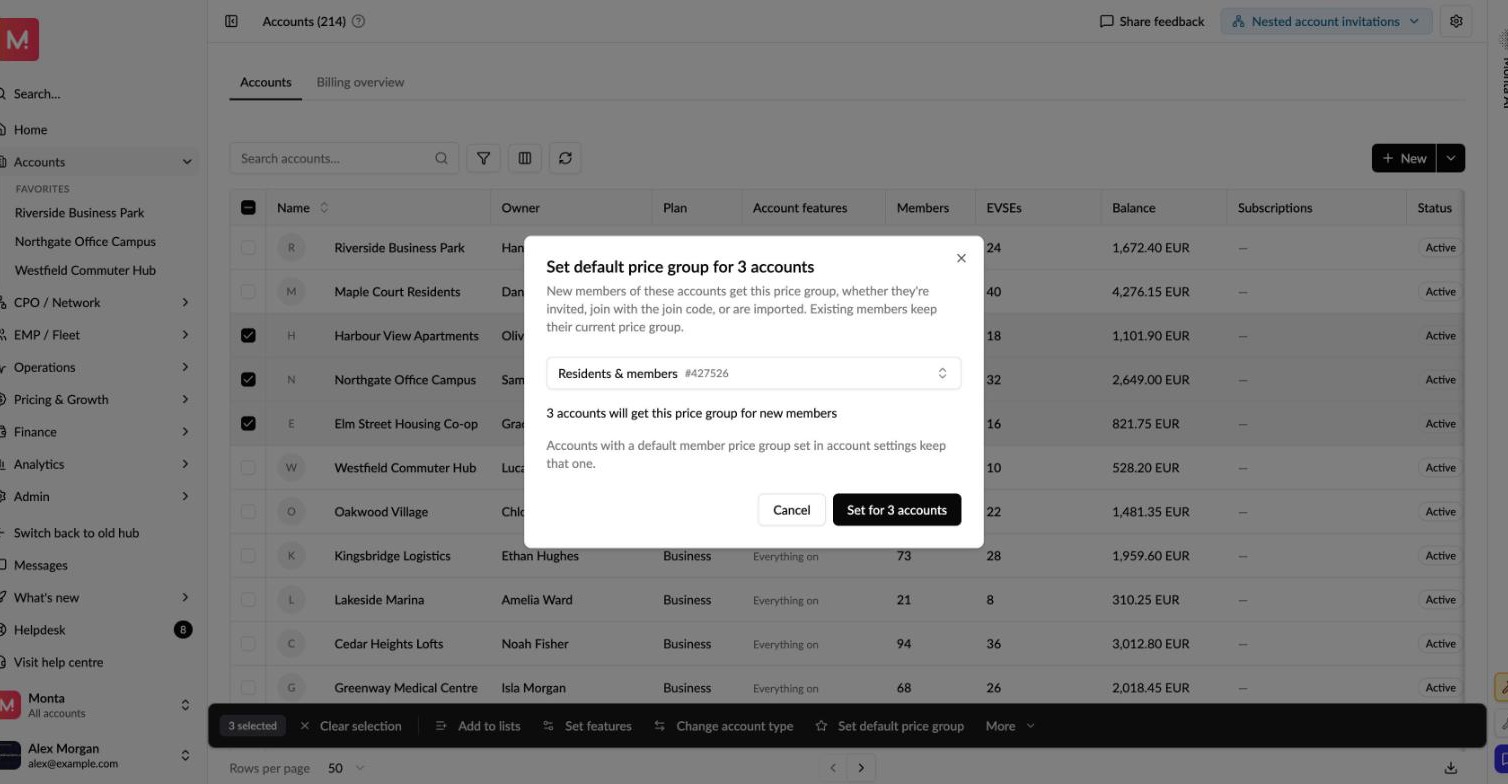
Price + Market: pricing recommendations that read your local market
A second signal that holds a price move when the local market says it won't pay off
What's new — a second pricing recommendation that reads your local market, not just your price. Until now, pricing recommendations used one signal: where your price sits against nearby chargers, nudged toward the local median. Price + Market adds a second signal — how the local market is structured — and uses it to shorten a suggested move toward "leave it as it is" when moving wouldn't pay off. It never reverses a move or makes one bigger. The Price + Market model can recommend hold whereas the Price model would recommend a price cut in these cases: You already set the going rate — you're the local leader, so a cut only starts a race to the bottom. A larger operator sets the going rate nearby — moving wouldn't shift the market, only your margin. Nearby prices have converged — there's no room to move without breaking out of the local band. Switch models in one click — a model selector at the top of Pricing benchmarks and Apply recommended prices switches the whole page between Price and Price + Market. Both read the same daily snapshot, so the switch is instant, and your choice is kept in the page link so you can share the view. On Pricing benchmarks A verdict for every site — Room to raise, Priced above the market, Leave it as it is, or why a move was held: You set the going rate, Held to the local leader, Prices here have converged. The suggested price has its own column. Counts that follow the model — held sites move from raise or lower into hold, so you can see how much the market changes the picture. A detail view built around the market — what the price alone suggested, what the market check changed, what we found about the local market (for example "A larger operator sets the going rate nearby"), and how sure we are, based on how many comparable sites back the reading. Map of your market — the area around a site with every nearby charging location, as individual markers or a density view. Closer chargers count more — recommendations now weigh nearby chargers more than those further out, and each charger in the nearby list shows how much it counts. On Apply recommended prices Ranked by market-adjusted opportunity — a raise the market held drops down the list instead of ranking on a value it no longer shows. Market position and a map for every price group — the market conditions behind the group's verdict, and a map of all its locations. Apply, split and editor hand-off work as before — only the recommendation they act on changes. Ask Monta AI about it — ask why a site's recommendation was held, which sites the market says to hold, or what is shaping prices in an area. Activate it in Release channel, then open Pricing benchmarks or Apply recommended prices in Hub and pick Price + Market at the top of the page.
Read more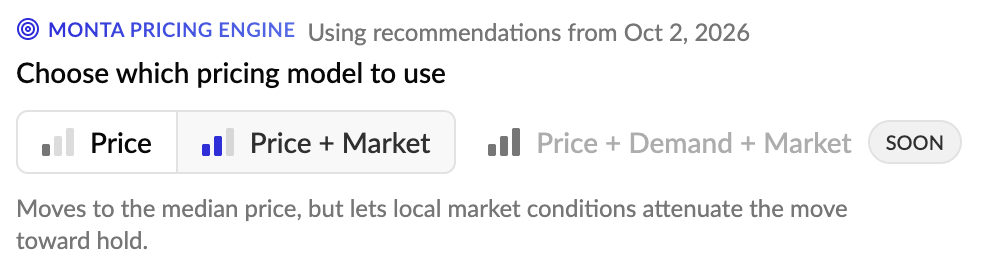
See the live status of every payment terminal in Hub
Your payment terminals now have their own live view in Monta Hub. You can see which terminals are online, which are taking a payment right now, and which are offline or misconfigured, across your whole network or for one account at a time. Live terminal status: every terminal list shows each terminal as Online, In use or Offline. In use means a card is authorised and the charge is still running. Setup errors: terminals that failed their setup check show the reason, for example a MID that could not be detected or an unexpected currency. These terminals can't take payments until the error is fixed. Terminal dashboard: the Payment terminals page opens with totals for online, in use, offline and setup errors. Click a total to filter the list, switch to the Overview to see every terminal as a tile, and narrow the view to a single account. Terminals where you work: a charging station's page and an EVSE's page show the terminal serving it. The location and Network EVSE tables have optional Payment terminal and Terminal status columns. Live status: the Live status board shows terminals next to your charge points. Card payments can make up most of a network's revenue, and a terminal that stops working often goes unnoticed until drivers complain. With every terminal's status in one place, your teams can spot an offline or misconfigured terminal and get it fixed before it costs revenue. Open Payment terminals in Monta Hub to see the totals and the full list. Click Offline or Setup errors to see only the terminals that need attention. On a location's EVSE table, add the terminal columns from the column picker. Online, In use and Offline are reported for Payter terminals. Nayax and local terminals don't report whether they're online, so they show as No status reported. How do I check that my payment terminals are working?
Read moreSeparate charge key limits for Personal, Private and Professional accounts
What's new: Personal, Private and Professional accounts now each have their own charge key limits. New charge keys start at Monta's recommended limits for the account type, and each limit has a maximum that you can raise a key to. Personal: new keys start at €300 spend per 30 days, 6 charges per day and 2 charges at a time. The maximums are €500, 6 and 2. Private: new keys start at €700 per 30 days, 6 charges per day and 2 at a time. The maximums are €3,500, 20 and 5. Professional: new keys start at €1,000 per 30 days, 14 charges per day and 7 at a time. The maximums are €5,000, 30 and 10. You can also set lower maximums for a single Private or Professional account. New keys on that account still start at the recommended limits, lowered to the account's maximum where that is lower. Existing charge keys keep the limits they have today. Why it matters: Personal and Private accounts used to share one starting limit of €200 per 30 days, with little room to raise a key above it. Each account type now starts at limits that fit it, and you can raise a single key up to the maximum when it needs more. How to use it: To raise a key's limits, open the charge key in Monta Hub and change its usage limits, up to the maximum shown for each limit. To set lower maximums for an account, open the account in Monta Hub and go to Charge keys, then Settings.
Read moreMonta Data Warehouse: Operator-owned price groups now available
New PRICE_GROUPS and PRICE_GROUP_PRICINGS views replace TEAM_PRICE_GROUPS and TEAM_PRICE_GROUP_PRICINGS, which are being deprecated
The TEAM_PRICE_GROUPS and TEAM_PRICE_GROUP_PRICINGS models are being replaced by the new PRICE_GROUPS and PRICE_GROUP_PRICINGS models. Please move your queries and integrations over before the dates below: Week 4, 2027 (week of 25. January): both old models get a `DEPRECATED__` prefix in their names. Any query that uses the current names will stop working. The data remains available, however, and repointing to the new name allows you to keep using the old models. Week 8, 2027 (week of 22. February): both old views are removed for good. Until then, the old models keep working exactly as they do today and still return team-owned price groups only. Price groups can now be owned by an operator as well as by a team, and the Monta Data Warehouse now includes both kinds: PRICE_GROUPS lists every price group for your teams and your operator, whether a team or the operator owns it. PRICE_GROUP_PRICINGS lists the pricing setup for each of those price groups. Both views have two new columns, OWNER_TYPE (Team or Operator) and OWNER_ID, so you can see who owns each price group. Up to now, price groups set up at operator level in the Hub were missing from the Monta Data Warehouse. The new views include them, so your reports show all of your pricing. Change TEAM_PRICE_GROUPS to PRICE_GROUPS, and TEAM_PRICE_GROUP_PRICINGS to PRICE_GROUP_PRICINGS. In PRICE_GROUP_PRICINGS, the price group reference is now called PRICE_GROUP_ID (it used to be TEAM_PRICE_GROUP_ID). TEAM_ID is empty for price groups an operator owns. To get the same results as the old views, filter on OWNER_TYPE = 'Team'. You can find full column definitions in the Monta Data Warehouse documentation.
Read moreSee and message the people behind a subscription or plan
A new Customers tab on subscription and plan detail lists the account admins each one reaches, with a Message action on every row.
Subscription and plan detail pages in Monta Hub now have a Customers tab that lists the people behind them. On a subscription, it shows the admins of the account the subscription is billed to, or of the account that owns the charge point for a charge point subscription. On a plan, it shows every admin of every account with a live subscription to that plan, each person listed once and searchable by name or email. Each row shows the person's photo, name, phone number and email, and the name links to their user page. The Message action on a row opens the Hub compose dialog for that person, so your team can reach them by push notification, SMS or email without leaving the page. Messages go to one person at a time. Operators who sell subscriptions or plans to accounts or charge points in Monta Hub. The tab appears for roles that can view subscriptions, and the Message action appears for operators with Hub messaging enabled. Subscriptions owned by a sub-operator don't belong to an account, so they have no Customers tab. In Hub, go to Plans & subscriptions. Open a plan, or a subscription, and select the Customers tab. Search for a person, or select their name to open their user page. Select Message on their row, choose the channels and send.
Read moreA public roadmap of what Monta is building
See what we're exploring, building and have shipped, in Monta Hub and on the Monta Updates site.
We're introducing a new public roadmap that shows where Monta is heading. Every item sits in one of three stages: Exploring, Building or Live. You're able to filter the roadmap by stage and by theme, such as Energy management, Payments and billing, or Roaming and interoperability. You can see what's coming next and what has already shipped, in one place. Live items link straight to the changelog posts that describe them, and items in progress will show their latest changelog updates, so you can follow a feature from idea to release. The roadmap is available in two places: in Monta Hub under What's New → Roadmap, and on the Monta Updates site at updates.monta.com/roadmap, next to the changelog. Each roadmap item will also get its own page that you can share with your team.
Read more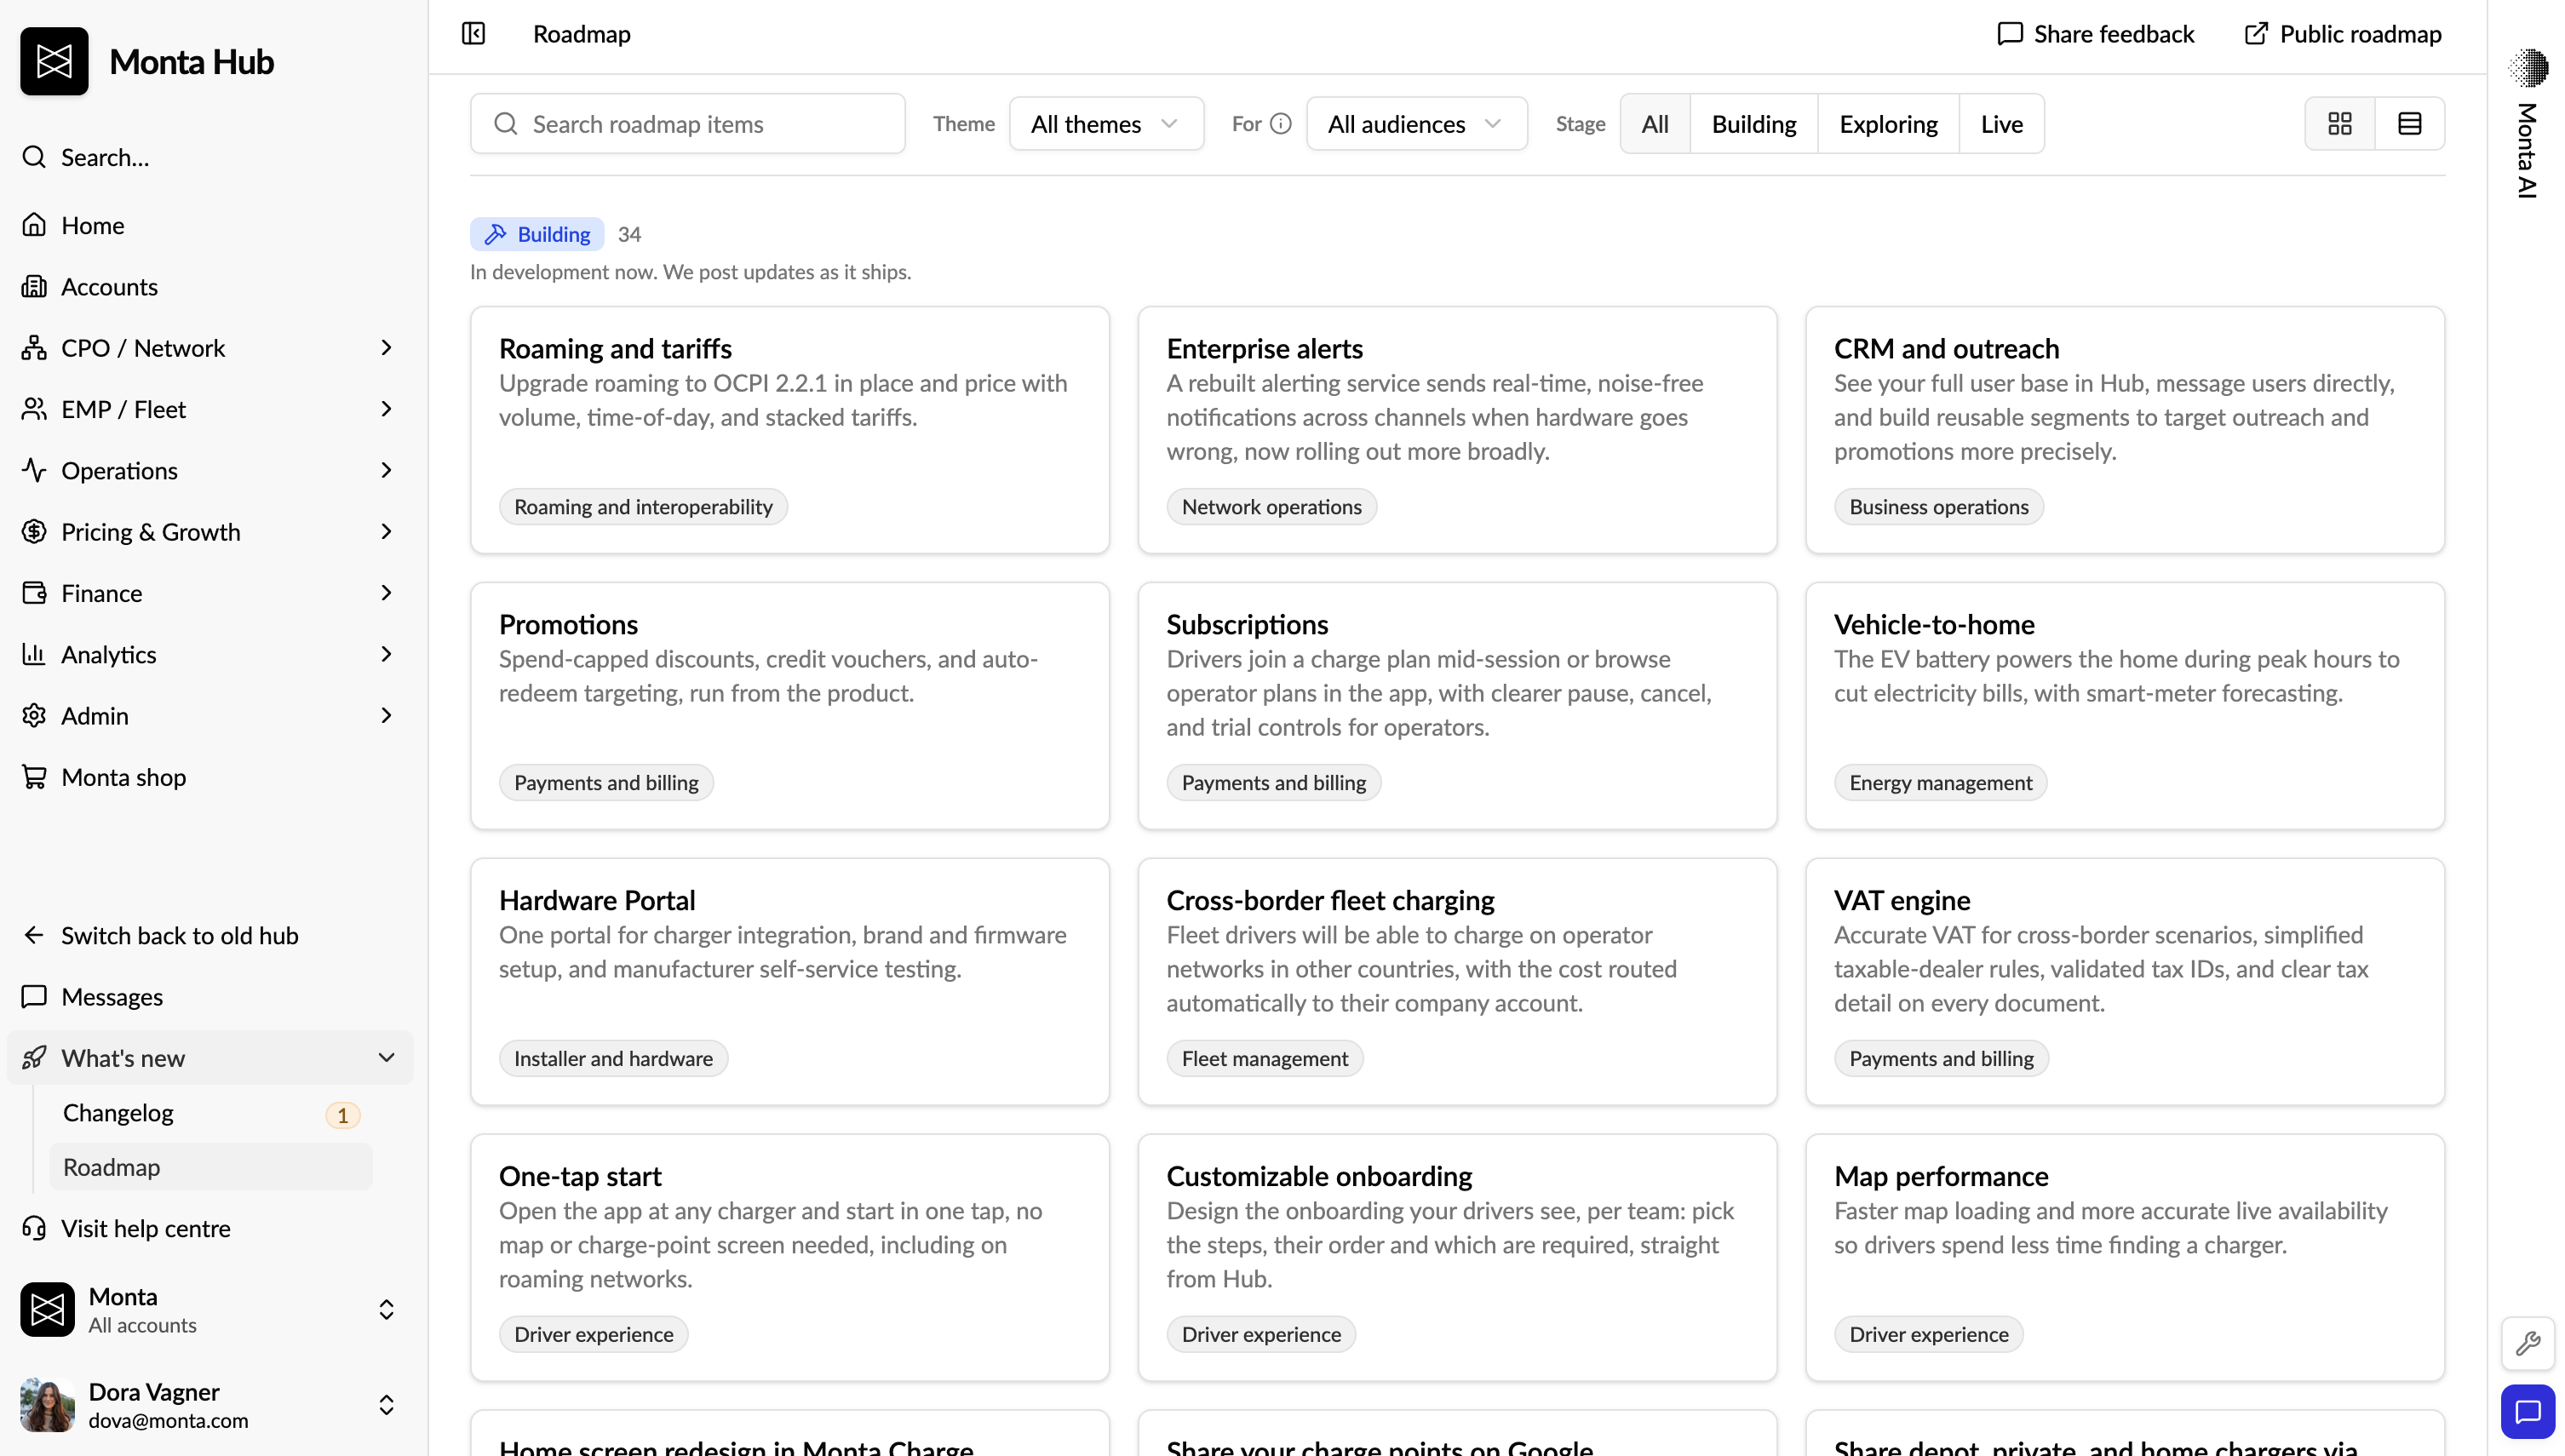
Apply recommended prices, one price group at a time
Turn pricing recommendations into price changes, ranked by opportunity
What's new — pricing recommendations you can act on, not just read. Pricing benchmarks show where each location sits in its local market. Apply recommended prices takes the next step: it turns those recommendations into concrete changes at the level you actually set prices — the price group — so you no longer have to work out which group to edit or how to translate a target €/kWh into its pricing. One row per price group — recommendations for every location on a group are combined into one change, showing how many locations it affects and whether they all point the same way. Ranked by opportunity — groups are ordered by estimated 30-day revenue opportunity at current volume, so you can start where it matters most. Apply in one click — for groups priced per kWh, apply the recommended change directly and the new price goes live for every location on the group. Fees and tariffs stay as they are. Or finish in the editor — for other groups, open the price group editor with the recommended price already filled in, then review and save. Split mixed groups — when a group's locations disagree on direction, split them into new price groups so each can follow its own market. Linked to Pricing benchmarks — jump between a location's benchmark and its price group's recommendation. Ask Monta AI about your pricing — ask which locations need a price change, what the going rate is for AC or DC charging nearby, or who your competitors are around a specific site. Better market data underneath — competitor locations listed by more than one source are now matched more reliably, more local operators are included in comparisons, and the daily refresh is more robust. Activate it in Release channel. You'll find it in Hub under Pricing → Apply recommended prices.
Read moreSeptember 2026
9 updatesTake connectors out of service when you put an EVSE in maintenance
When you turn maintenance on or off for an EVSE in Hub, you can now also change the connector's availability on the charging station itself. The confirmation dialog has a new option that sends an OCPP Change Availability command for the EVSE's connector: Maintenance on: tick Also set connector to inoperative, and the connector no longer allows any charging. Maintenance off: tick Also set connector back to operative, and the connector is ready for charging again. The option is ticked for you when the connector currently reports Unavailable. The same option is there when you turn maintenance on or off for several EVSEs at once from the EVSE lists on the Network, Account and Location pages. Maintenance mode tells drivers in apps such as Monta Charge that an EVSE is under maintenance, but the charging station itself kept offering the connector: its screen and LEDs still looked operational, and it still allowed charging. Taking the connector out of service meant sending a separate Change Availability command. Now it's one action. Open an EVSE and choose Set maintenance on (or off), or select EVSEs in a list and choose maintenance from the bulk actions bar. In the confirmation dialog, tick the connector availability option. Confirm. Works for OCPP 1.6 and 2.0.1 charging stations. How the screen, LEDs and authorization react to an inoperative connector depends on the charging station model. Only the EVSE's own connector changes. Other EVSEs on the same charging station are not affected. If the charging station is offline, the dialog warns you and the command isn't sent. Maintenance is still applied, so resend the availability change once the charging station is back online. If a charging session is in progress, the charging station may apply the change once the session ends. If it rejects the change, maintenance is still applied and Hub tells you. Connector availability isn't changed when you schedule maintenance, request approval, use maintenance windows, or turn on maintenance from the Charging stations tab.
Read moreSet your own kWh limit for guest charging
Operators can now set their own kWh limit for guest charging, instead of Monta's regional default of 80 kWh (110 kWh in North America). For many locations that default reserves far more on the guest's card than the charge needs. A new kWh limit per guest session setting under Admin → Settings, between 30 and 300 kWh. It sets both the pre-authorisation on the guest's card and the point where the session stops. It applies to drivers who charge without a Monta account: payment terminals, web checkout and App Clip, and RFID cards not linked to an account. Leave it empty to keep Monta's regional default. A smaller hold on the guest's card means fewer declined or abandoned payments. A higher limit lets vehicles with large batteries charge fully in one session. How do I set the kWh limit for guest charging?
Read more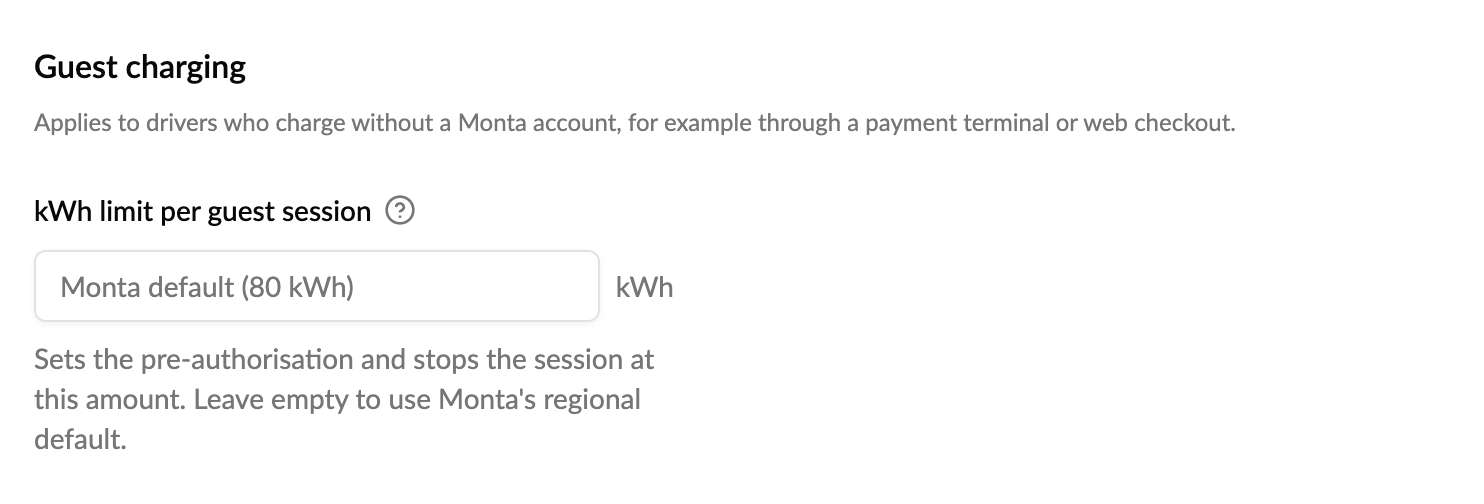
Lower the charge limit automatically when a location is busy
You can now lower the charge limit on DC charge points automatically while a location is busy, so fast charge points free up faster for the next driver. Add rules to a location, such as while at least 75% busy, limit charges to 90% and while at least 90% busy, limit charges to 80%. When the location quiets down, the limit is removed again. Monta measures how busy the location's DC charge points were over the last hour. Occupancy history shows every measurement and which limit applied, and each DC charge point shows why its default charge limit is locked. Above about 80%, most cars charge much more slowly. At a full location, those last minutes block a fast charge point while other drivers wait. Lowering the limit only at peak times turns charge points over faster without capping charging the rest of the day. Operators with busy public DC locations, such as highway and retail fast-charging hubs. Open a location and go to Settings → Configuration → Busy-location charge limit. Add your rules, or select Use recommended rules, then save. Check Occupancy history to see how busy the location was and adjust the rules. It applies to DC charge points only, at locations with at least two DC charge points. Only charges that start while a rule applies are affected, and drivers who set their own charge limit keep it. Available now in early access. Read more in the help centre. Hub → Location → Settings → Configuration → Busy-location charge limit.
Read more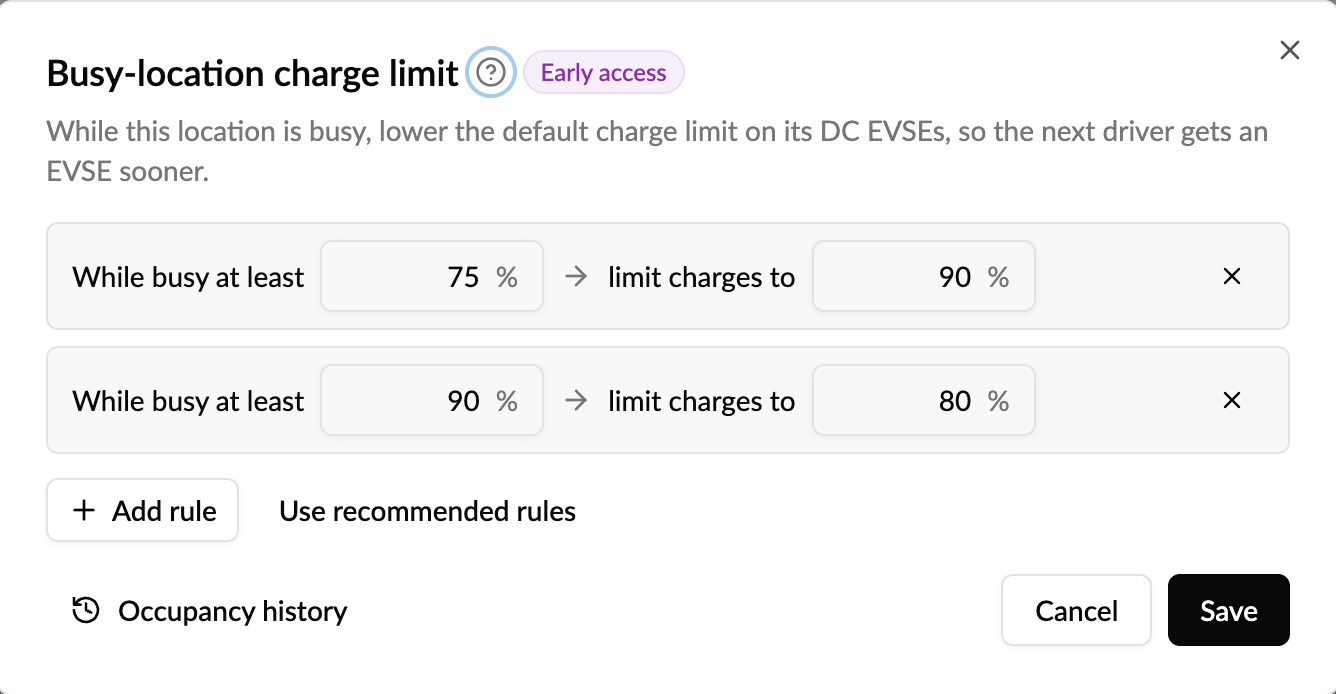
Sell any price through a charging subscription
Charging subscription discounts now support fixed price, spot price and fees, next to a percentage off.
Charging subscription plans in Monta Hub can now carry a discounted Price Group, next to the existing percentage discount. Instead of taking a percentage off the charge point's regular price, a price group you define replaces that pricing entirely for subscribers. Anything your price groups can express, you can now sell through a subscription. That means an operator can offer, for example: "Subscribe for €30/month and always pay €0.35/kWh on our network." "Subscribe for €30/month and always pay the spot price on our network." "Subscribe for €30/month and pay €0.35/kWh, with a €0.50 start fee per charge." You can set different price groups for AC and DC sessions, restrict the discount to specific charge points or locations, and cap it per subscription period with a monetary or kWh limit. Drivers see the subscription price throughout their charging journey in the Monta Charge app and your white-label app, so what they are quoted is what they pay. Create the price group first under Global configurations > Price groups. Then, when creating a discount in Plans & subscriptions > Discounts (or inline while creating a charging subscription plan), choose Price Group as the discount type and select it. See How do I create a charging subscription plan? for the full walkthrough. A percentage discount still moves with the underlying tariff, so subscribers could never be promised a concrete price, while operators were sweating as their margins on spot pricing get reduced through a fixed percentage discount. A risk we wanted to eliminate. Subscription pricing now matches the flexibility of Monta's pricing engine, letting you sell predictable fixed-price offers, pass spot prices through, or bundle fees, and package them as a recurring plan your customers can rely on. Release ETA: This will be live end of this week!
Read moreE-documents in Monta Hub: see your DGFiP e-reports, now live in France
A new Finance section shows French operators every e-report Monta files on their behalf, with e-invoices appearing as soon as they are issued.
What's new French e-invoicing and e-reporting are mandatory as of September 2026. Monta files the required DGFiP transaction reports for you every ten days, and you can now see what was submitted in Finance → E-documents in Monta Hub. The E-reports tab lists every report filed for your operator and for the accounts underneath it. For each report you can see: The reporting period it covers and the date it was submitted, with filters for both Who it was issued by — your operator or one of your accounts — with a filter to narrow the list to a single account The reported total, including tax, per currency Its status — delivery and acceptance by the DGFiP Open a report to see the detail drawer: domestic B2C sales grouped per day and per VAT rate, and cross-border sales with net, tax, rate and total. Where a filing has been corrected, the earlier revision stays listed alongside the new one as an audit trail. Coming soon: E-invoices The E-invoices tab will show the e-invoices Monta issues on your behalf as soon as they are sent: invoice number and format, counterparty and SIREN, date, net amount and transmission status, newest first. Click an invoice to see both parties, the lines with their VAT rate, a per-rate VAT breakdown, and the compliance details. Why it matters E-documents gives you the proof of filing and the figures behind it in the same place you manage the rest of your finances. Who it's relevant for Operators and businesses based in France. Access is governed by your finance permissions. Where to find it Hub → Finance → E-documents. Read more about French e-invoicing.
Read more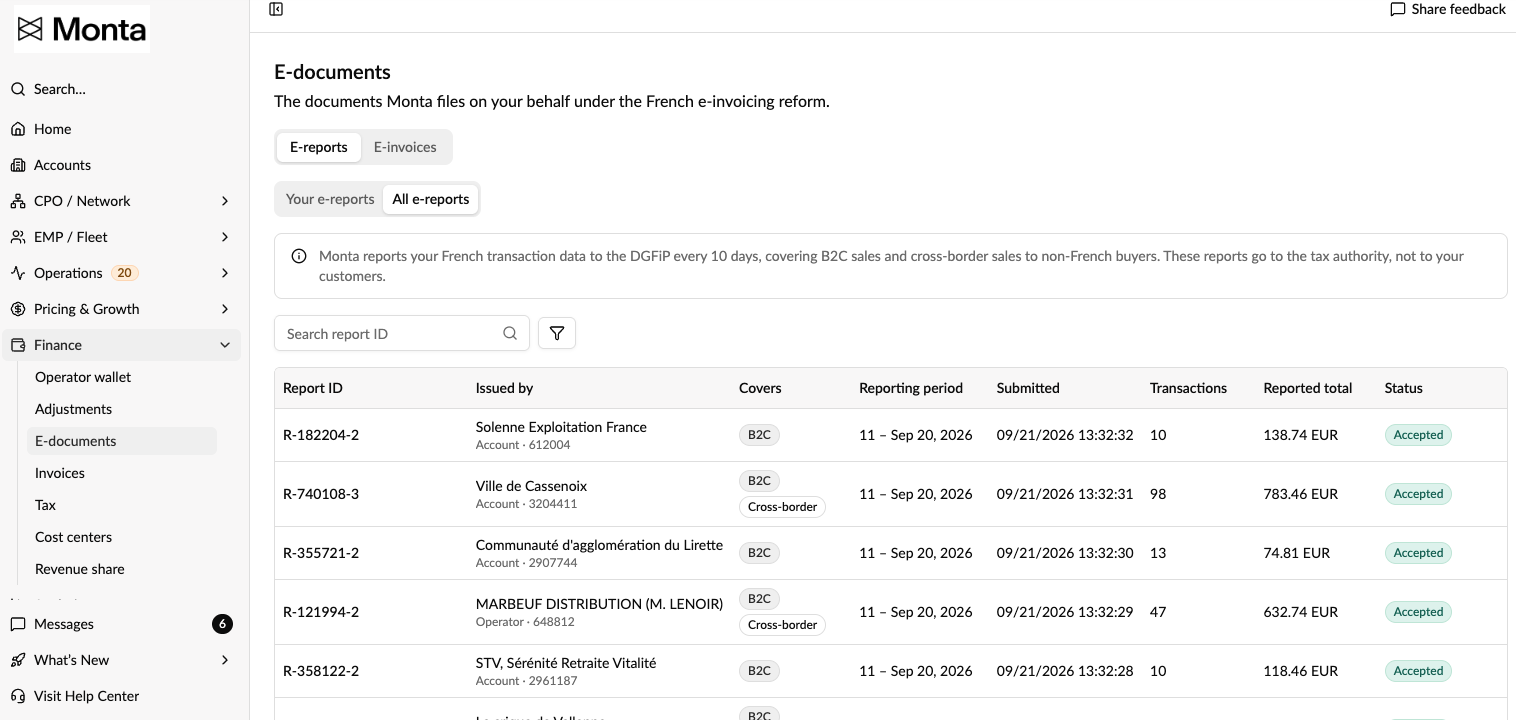
Cost centers: attribute charging spend to departments, fleets and business units
Tag members, vehicles and RFID cards once — every charge inherits the right cost center for reporting and reconciliation
Cost centers let you split EV charging spend across your internal business structure — departments, sites, fleets or any other unit — directly in Monta Hub, so finance can reconcile charging against the ERP without manual post-processing. Create cost centers at operator level (shared across all your accounts) or per account, each with a name and an external ID for mapping to your accounting system. Bulk-create them from a CSV. Assign them to members, member groups, nested teams, vehicles and RFID cards (charge keys) — individually from the entity's page, or in bulk from the list views. You can also set an account-level default. Automatic attribution: every new charge inherits a cost center following a fixed precedence — member, member group, nested team, vehicle, RFID card, then the account default — and records which one it came from. Reporting: filter the charges list by cost center, add a cost center column, and see the resolved cost center and its source on each charge's detail page. Finance data and exports: the resolved cost center is carried onto the charge record and the wallet transaction, and is included in your charge and transaction exports, ready for reconciliation in your accounting system. Partner API: manage cost centers programmatically — create, list, update and delete them, and assign a cost center to accounts, members, member profiles and charge keys through the existing update endpoints. Fleet operators, enterprise customers and CPOs running multi-department organisations have had no way to tell which part of the business a charge belongs to. Cost centers make that attribution automatic and consistent, based on who charged, which vehicle was used or which card was presented — and because the label is snapshotted at charge time, historical data stays stable even if a cost center is later renamed or removed. Cost centers are rolling out as an early-access feature — reach out to your Monta contact to get it enabled for your operator. Cost centers are buyer-side data: a CPO selling charging to a customer does not see that customer's cost center labels.
Read moreSee who has access to your operator, and remove people who have left
A dashboard overview to navigate your members in one place and revoke access for people who are no longer with your organisation.
As people join and leave your organisation, access to your operator builds up: leavers who still have a login, admins who never signed in, invites that were never accepted. It has been hard to see who should still have access. Under Admin → Members → Overview you now get one place to navigate everyone with access to your operator. It puts the access worth reviewing first (people who have left, stale invites, admins who never signed in, personal email addresses instead of company ones, and look-alike duplicates) so you can spot who no longer belongs and revoke their access in a few clicks. Alongside it, you get a breakdown of access by role and by email domain. Overview surfaces what needs review. The All members tab is where you manage everyone day to day: search and filters, single or bulk invite, per-member role and access-expiry, and bulk set-role, set-expiry and remove.
Read more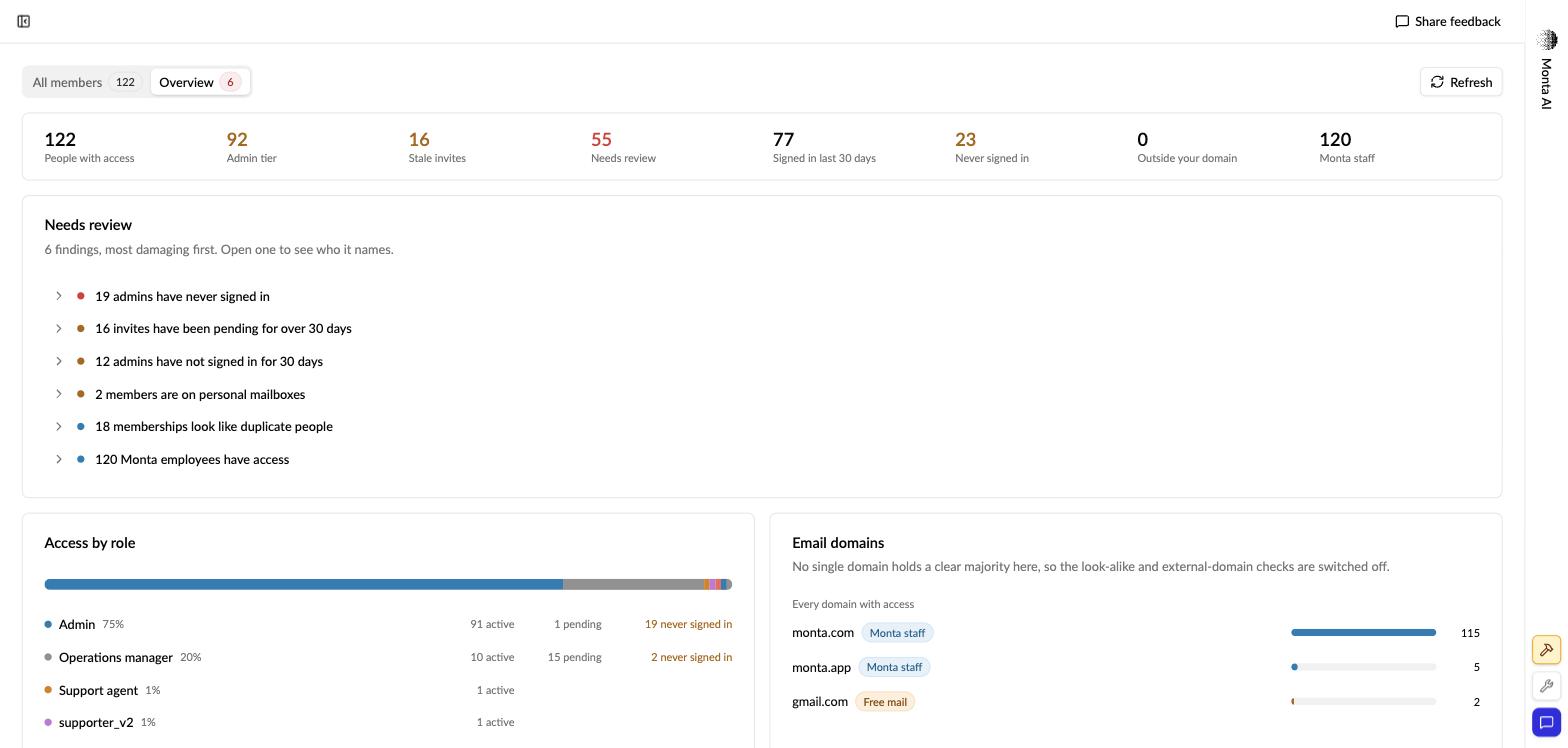
Location layout: arrange your charge points on a site plan
Place each EVSE on a schematic grid or satellite map so drivers can find an open stall
Location layout lets you arrange a site's charge points on a visual plan, so a driver can see at a glance where each stall sits and which one is free. You build it once in Monta Hub, on the location's Layout tab. Two backdrops are available: a schematic grid for a clean diagram, or a satellite map where stalls are pinned to real coordinates. Alongside the stalls you can drop orientation markers that don't charge — entrance, exit, building, ground areas and amenities — so the plan matches what a driver actually sees on arrival. Stalls and markers can be resized and rotated, and a station's EVSEs can be grouped and moved as one unit. A driver preview sits next to the editor and shows live availability — which stalls are available, in use, reserved or unavailable, and which is nearest — so you can check the plan reads correctly before you publish it. On a large site, a driver arriving at a location has no way to tell which stall is free without driving the rows. A layout turns the site into something they can read at a glance, and it gives your team an accurate picture of where each EVSE physically sits rather than just a list of IDs. Operators running multi-stall sites, especially larger locations where finding an open stall is not obvious from the entrance. In Monta Hub, open the location and go to the Layout tab. Pick a backdrop: schematic grid or map. Drag your EVSEs onto the plan and position them; group a station's EVSEs where relevant. Add any reference markers — entrance, exit, building, amenities. Save, then use the driver preview to check what drivers will see. If you add or remove EVSEs later, the layout reconciles automatically: new EVSEs appear as unplaced so you can drop them in, and removed ones fall away. Available now in Monta Hub. In this first edition the layout is not shown in the Monta mobile app yet — you build and publish it in Hub, and drivers view it through the shareable web preview. Bringing the layout into the mobile app is planned for a later release. Hub → CPO/Network → Locations → open a location → Layout
Read more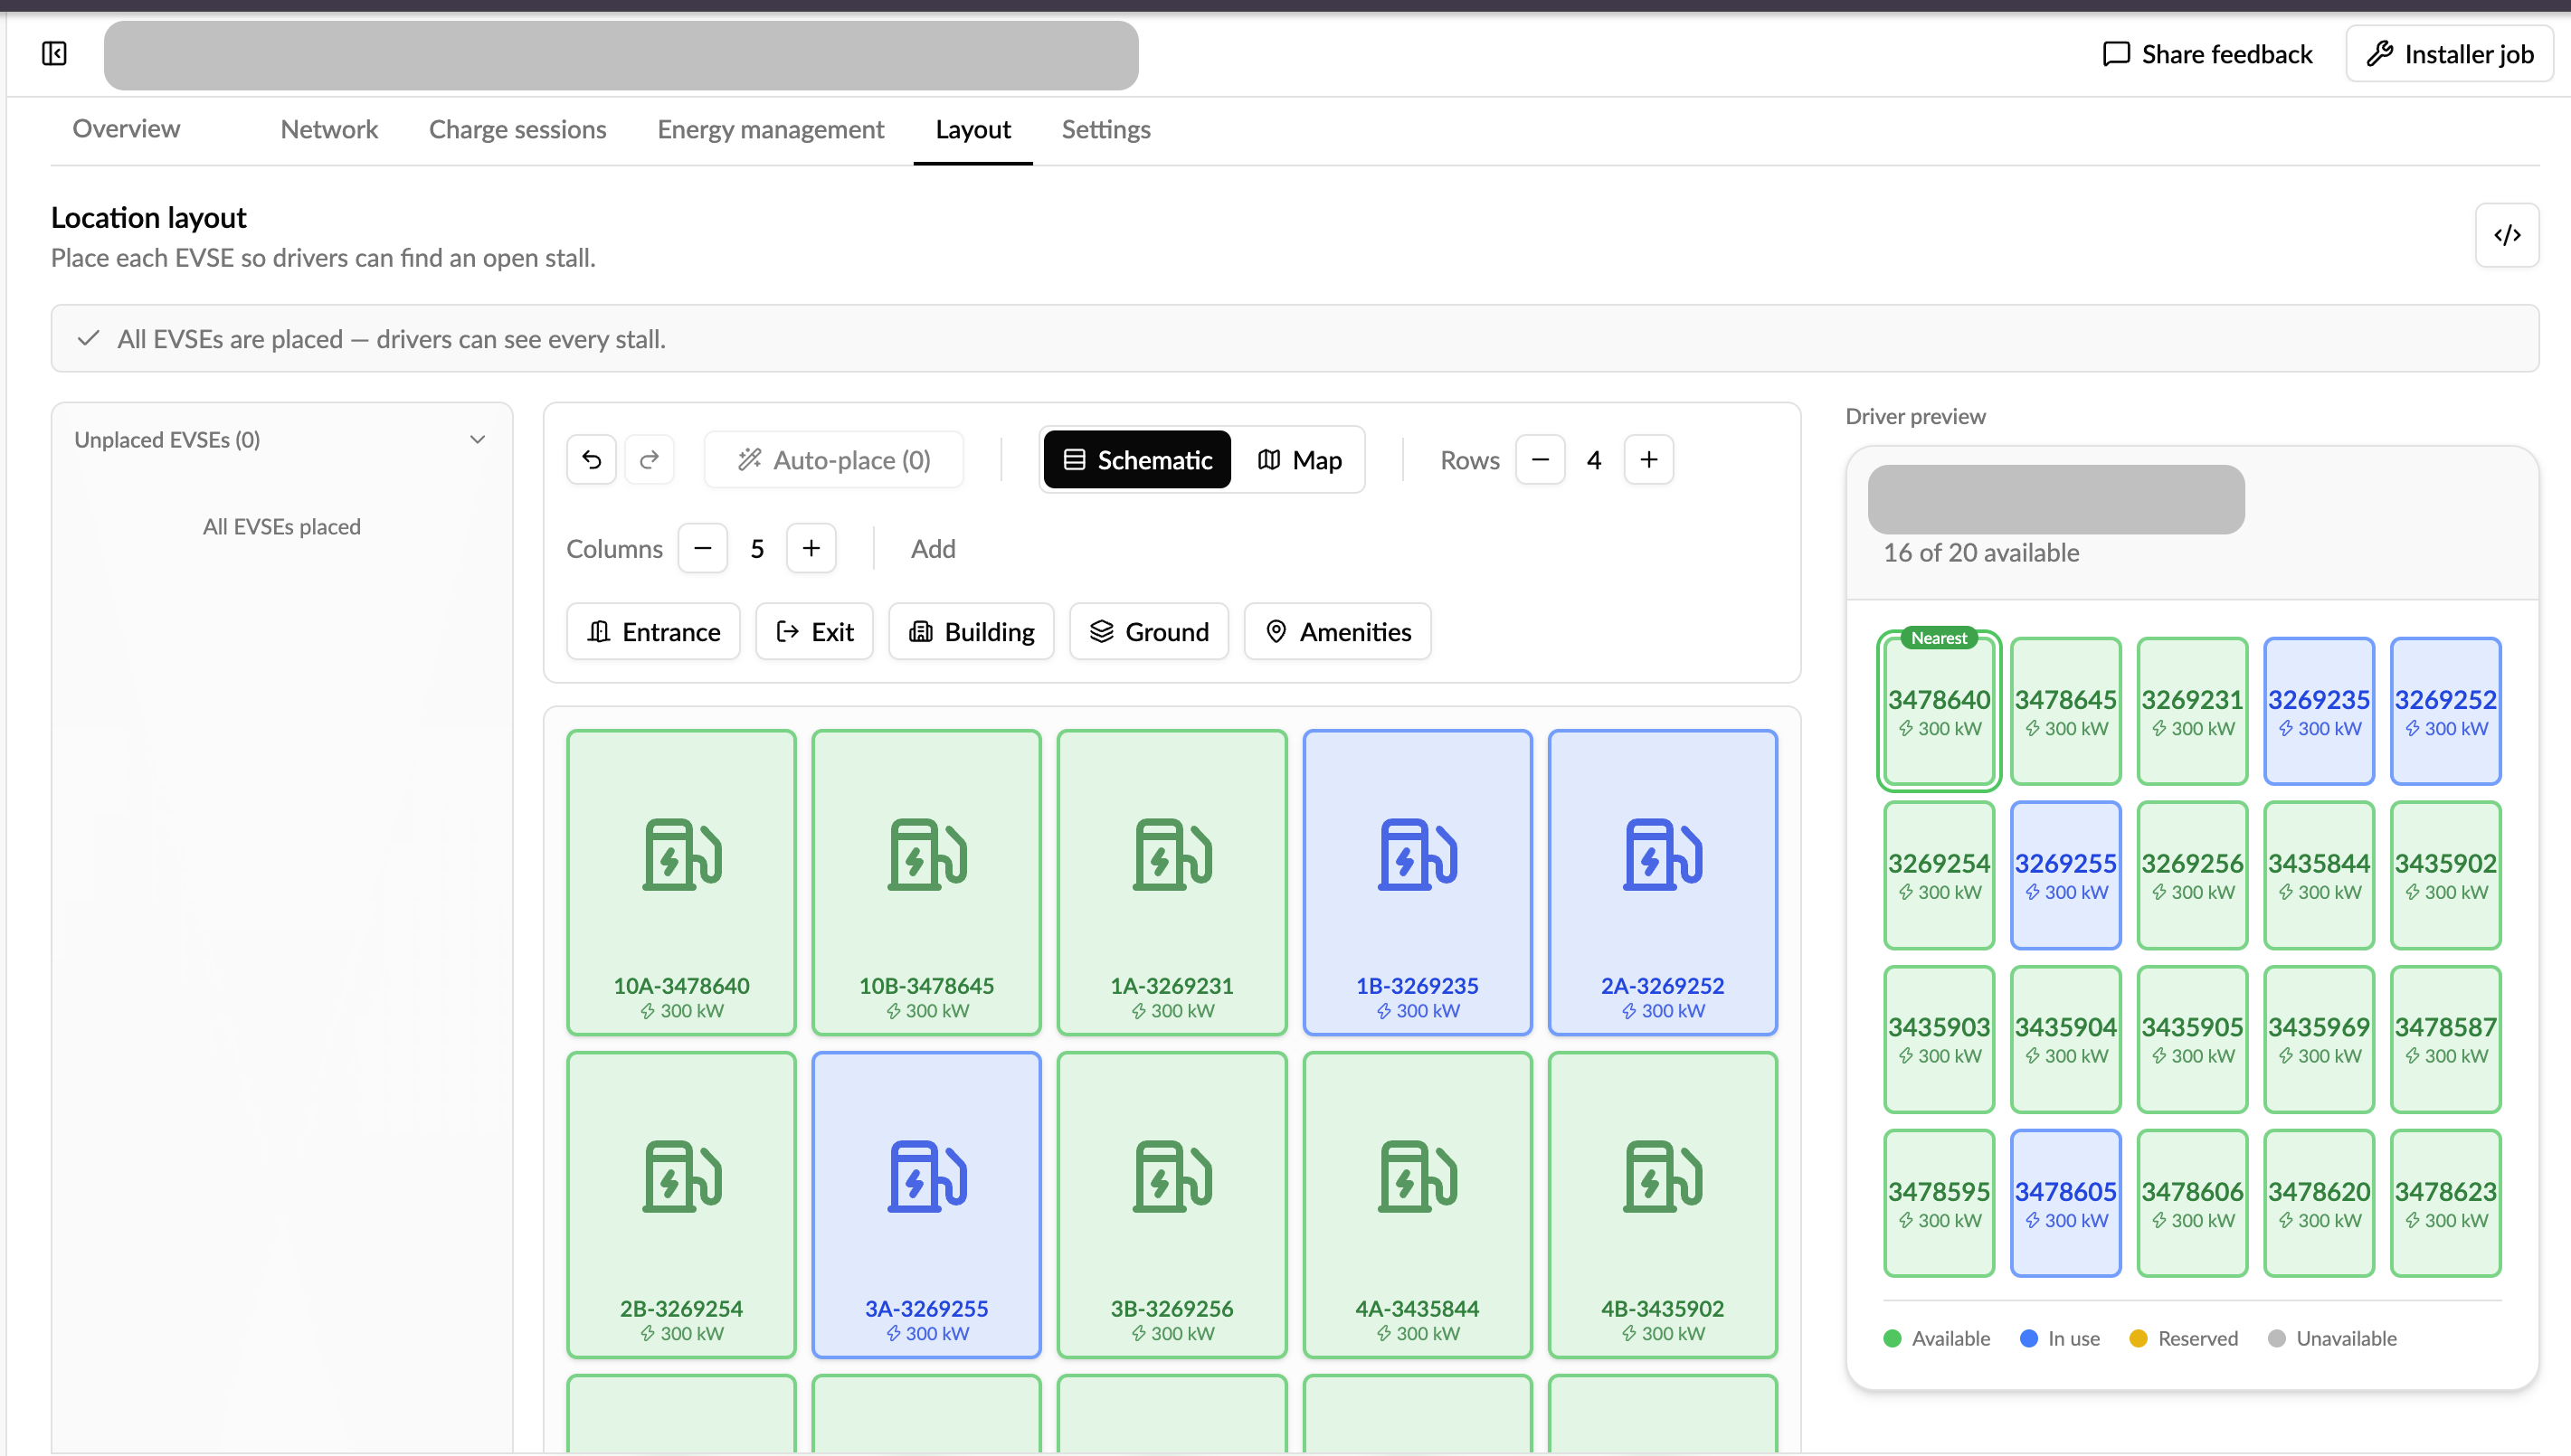
Spending limits for your drivers
Cap how much your drivers spend, how often they charge, what price they pay and when
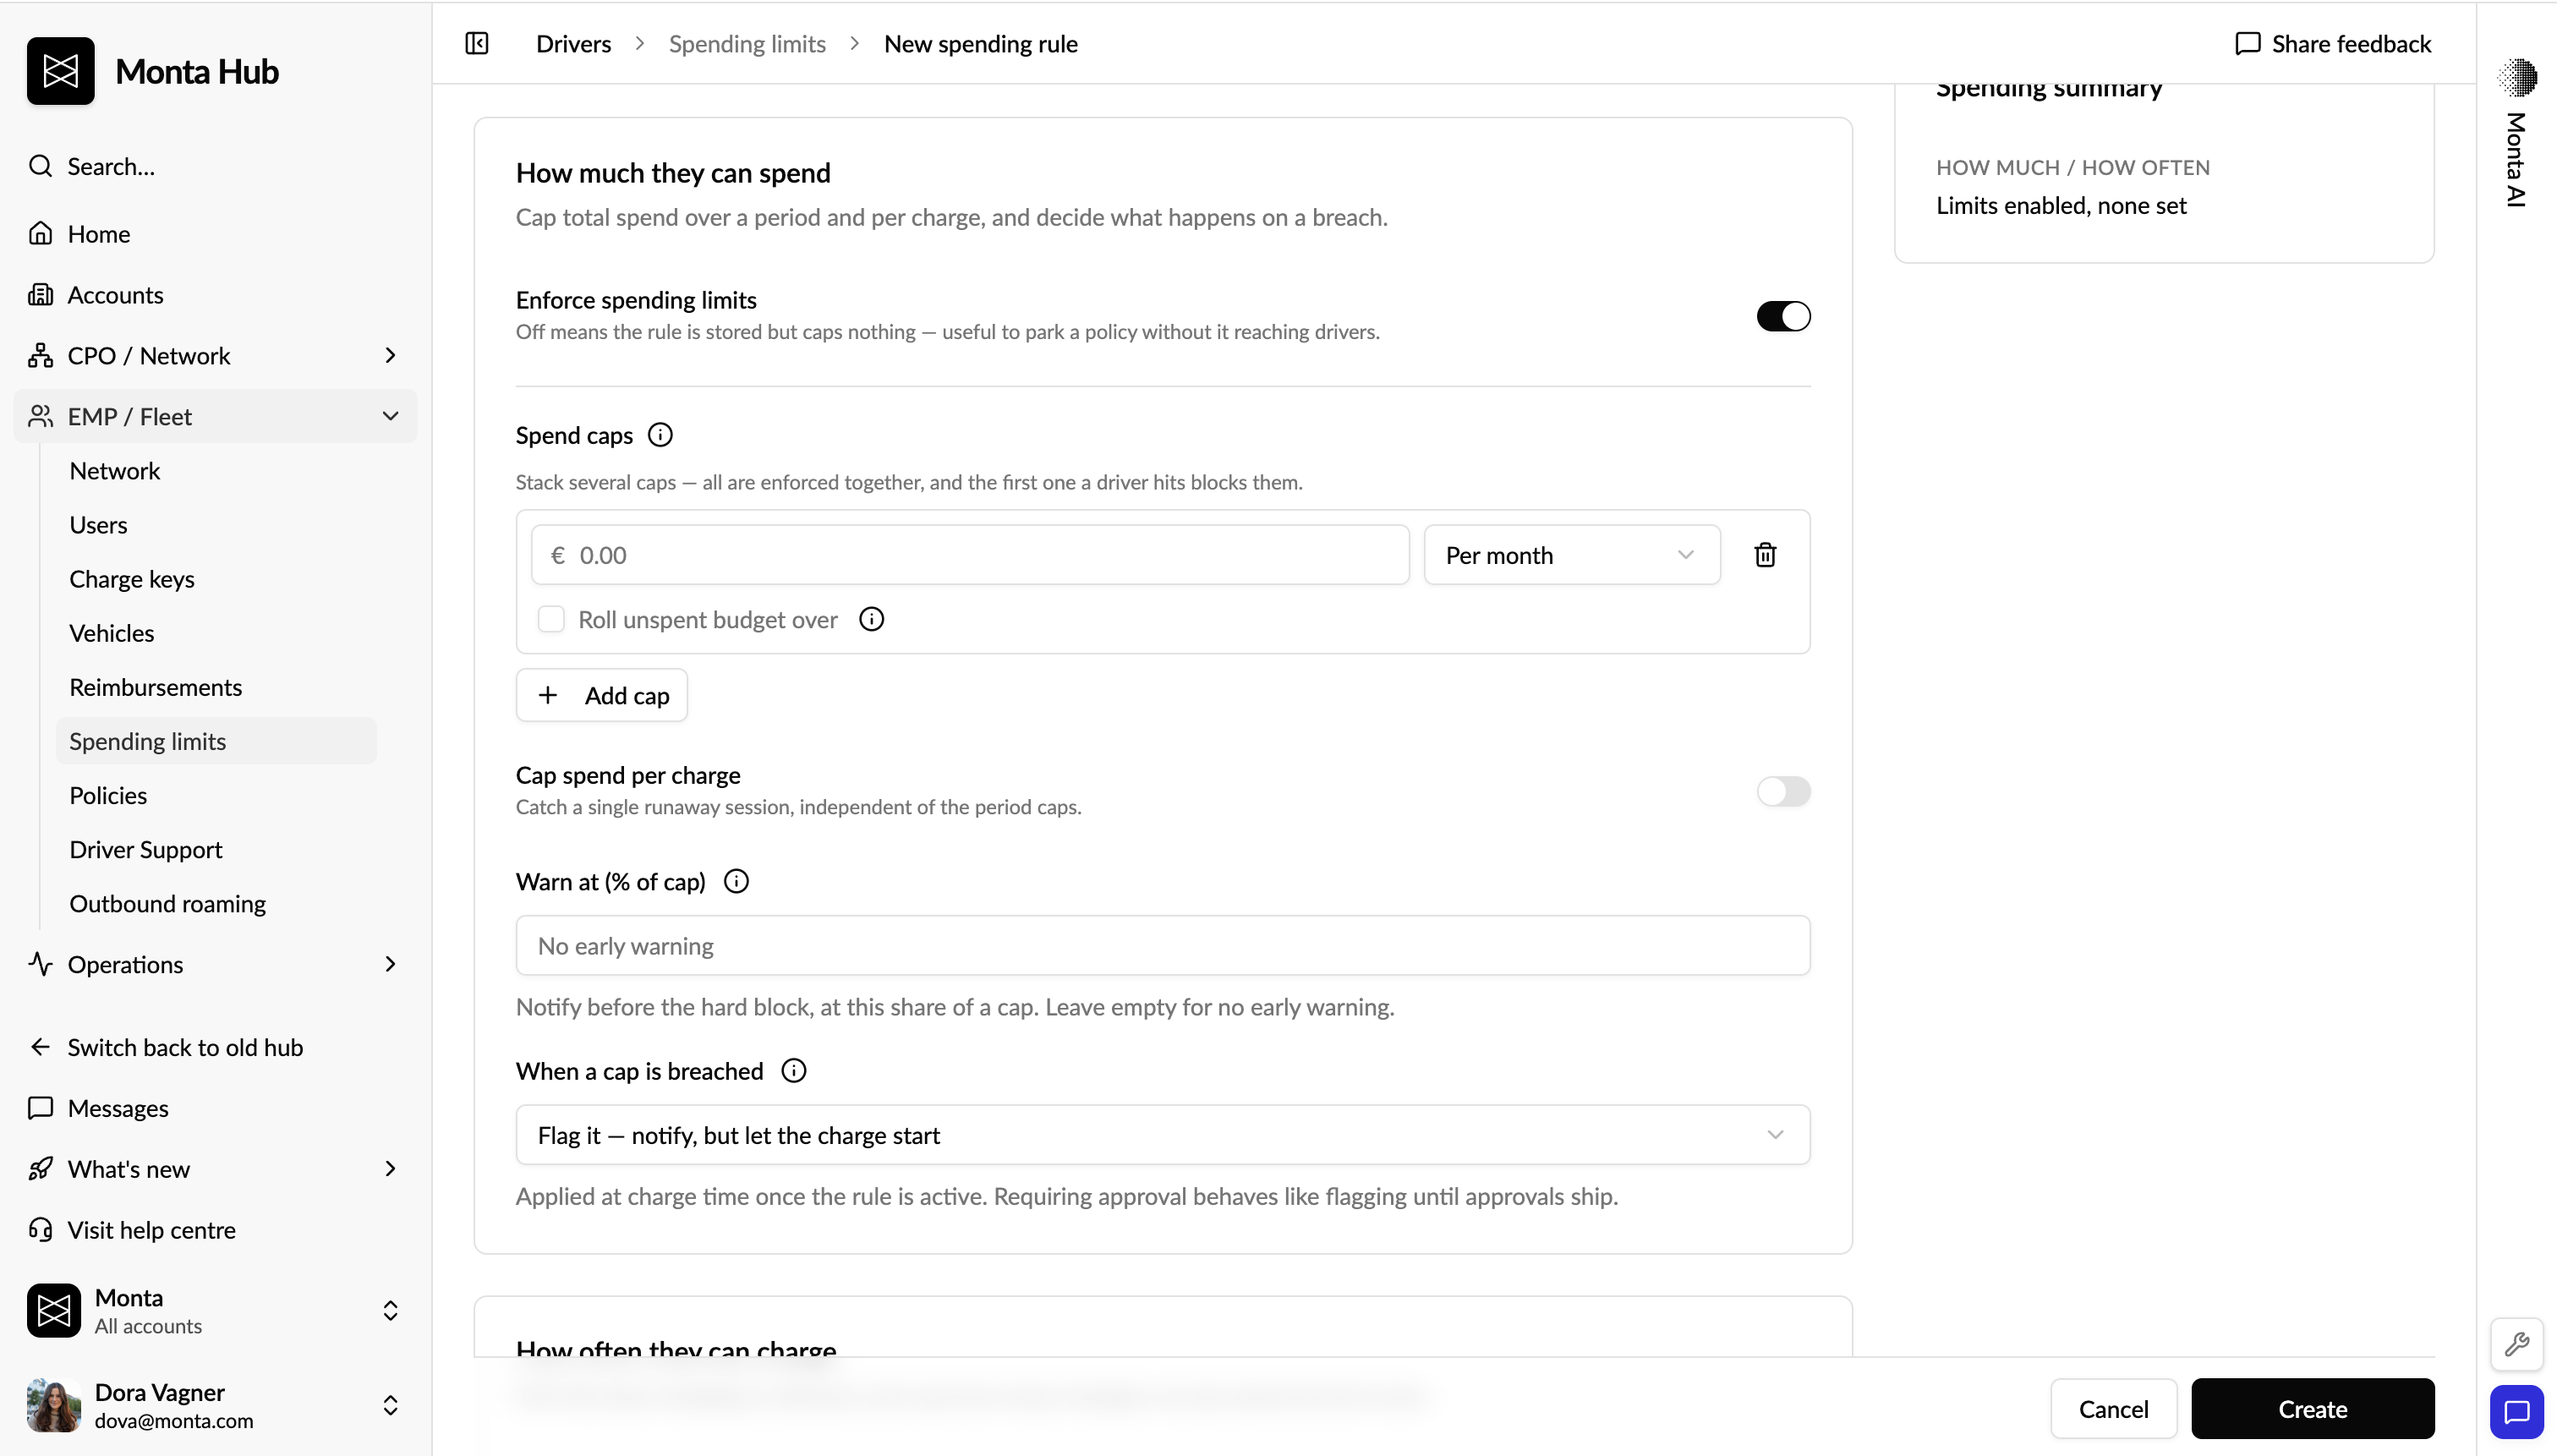
Spending limits let you put guardrails on how your drivers charge — how much they can spend, how often they can charge, what price they may pay, and when they can charge. You build a reusable spending rule once and assign it to the accounts, drivers, vehicles or charge keys it should govern. A rule can combine any of the four dimensions below, and each one is optional. How much — total spend per period plus a cap on any single charge, for example €300 per 30 days, €50 per day, €60 per charge. You decide which cost components count: energy, minimum price, idle fee and session fee. How often — number of charges per period and number of simultaneous charges, for example 4 charges per day, 1 at a time. What price — maximum price per kWh, set separately for AC and DC, plus caps on session fee and idle fee. When — which weekdays charging is allowed, measured in the driver's local timezone. Caps can be measured over a calendar period or a rolling window, and multiple caps stack — a charge is refused as soon as any one of them is reached. As you build a rule, Hub shows a live plain-English summary of what it will do. Today a sponsored driver can charge without limit. There is no way to bound what they spend, how often they charge, or what they pay per kWh — which means runaway costs, unpredictable monthly spend, and no protection against one expensive fast-charge draining a budget or an abusive repeat pattern going unnoticed. Spending limits turn that into a budget you configure once and apply wherever it belongs, with refusals recorded so you can explain afterwards why a charge was stopped. Fleet operators and employers who sponsor charging, and the finance teams that own the budget. Go to EMP / Fleet → Spending limits in Hub and select New to create a spending rule. Turn on the dimensions you need (spend, frequency, price or weekdays), set each cap and the period it is measured over (daily, weekly, monthly or rolling 30 days), and choose which cost components count toward your spend caps. New rules are saved as drafts. Activate a rule to start enforcing it at charge time. Apply the rule to the accounts, drivers, vehicles or charge keys it should govern, or attach it to a policy. A rule limits nobody until it is activated and applied. Available now in early access. Hub → EMP / Fleet → Spending limits.
Read more